
So, I want to manage my infrastructure with Ansible and test deploys with Vagrant, but I’m running Windows as my development machine, which is unsupported by Ansible. This is relatively straightforward if we use Windows Subsystem for Linux (WSL), but has a few caveats. But what if I also want to test my Ansible deploys with clean VMs using Vagrant? That configuration has a few more caveats. This post includes some notes on how this setup works and its caveats – it’s not a tutorial, but will hopefully help someone (or me in the future) to be able to set up this configuration a bit faster in conjunction with Ansible and Vagrant documentation.
There are some Ansible in WSL-specific lessons in here too, if you’re not interested in the Vagrant/Hyper-V setup – you can mostly skip to steps 2 and 3 in the list near the bottom for that.
First, consider the environment I’m describing, from a conceptual standpoint.
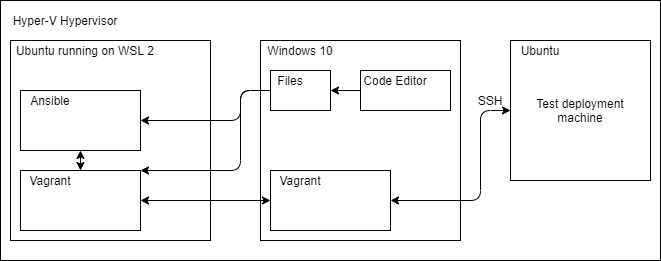
I want to point out a few things in the diagram:
- This setup requires two copies of Vagrant and results in two copies of Ubuntu running on the same device in separate partitions under Hyper-V.
- Ansible is only running within Ubuntu, and one of the challenges in this setup is that I need to make it basically completely unaware of Windows and the minor differences in Ubuntu on WSL versus standard Ubuntu.
- The diagram may be incorrect in having the Windows copy of vagrant communicating with the test deployment machine – it’s probably Ansible from the WSL Ubuntu via SSH directly, but it’s controlled via Vagrant (and Vagrant on Windows deploys that machine in the first place) – it’s a rough diagram.
OK, so here are the steps I took to get this working.
- Log in as an admin user on the machine if you’re not one already – the copy of Ubuntu running in WSL needs to be in an admin user’s profile, and you’ll need to be logged in as that user to access the Windows Store. Open the Windows Store and install your favorite Linux distribution – I used Ubuntu 20.04 for this. The reason it needs to be run as an admin is that when we install Vagrant within this distribution, the requests coming out of it to the copy of Vagrant in Windows need to have admin privileges to manage Hyper-V. It’s possible that simply managing a standard user’s Hyper-V permissions so that Vagrant can manage Hyper-V would work, but I didn’t test if Vagrant would be OK with that versus having actual administration privileges, in part because its error message was very clear that admin privileges are required. If you’re just interested in Ansible without Vagrant, you can skip doing this as an admin.
- OK, now let’s configure Ansible – this is the part that applied even for those that aren’t using Vagrant – if you just want to use Ansible in WSL, this is it. You can install Ansible from apt as normal, but you won’t be able to use it – with Vagrant or otherwise, because it will complain that all permissions are 777 – this is a quirk of WSL – everything appears writable by everyone, but that’s because Windows is managing permissions with NTFS in the background of that – it *does* make some effort to sync permissions, but especially in the home folder, everything appears writable within WSL by default. Ansible looks at this and says “ack! your private key is readable by everyone” and shuts itself down. It refuses to be a party to your failure to secure your private key. So, we need to get WSL to set different permissions on the folders and simple
chmodwon’t work for us here. With a hat tip to https://www.turek.dev/post/fix-wsl-file-permissions/ for describing the general case of the fix, we need to create or edit/etc/wsl.confto include the following:[automount] enabled = true options ="metadata,umask=22,fmask=0077
- The last part
fmask=0077is the most important – it tells WSL that files should be readable/writable as normal by the current user, but should have no access for anyone else, and it will use this as the default when mounting drives from Windows. It’s possible that this could create problems for you if you’re doing other things within WSL, so I want to flag it, but if Ansible is the main reason you’re using WSL, and even in most other cases (how many other users are you going to run in WSL?), it should be fine. - To apply those permissions changes, we need to reboot WSL – it *should* happen by logging out of WSL and back in, but I had to reboot my computer. If you just want to run Ansible without Vagrant, you’re done now and should be able to run Ansible to provision your infrastructure. If you’re here for the Vagrant/Hyper-V config, keep reading!
- You can log back in as your regular user now and open an elevated command prompt as the admin user. Run
bashto access Ubuntu in WSL – do any typical setup (likesudo apt-get update) and then install vagrant from apt (do it in here before doing it on Windows!). Determine which *exact* version of Vagrant you installed withvagrant versionand then go download that version for Windows from Vagrant’s website. Do not get a different point release – same version number to the final decimal is needed here. Install that version on Windows. - Vagrant has good documentation on running within WSL – definitely take a look if you haven’t already. You’ll need to edit
~/.bashrcto includeexport VAGRANT_WSL_ENABLE_WINDOWS_ACCESS="1"– that tells Vagrant that instead of trying to virtualize within Linux, it should communicate with the Windows copy of Vagrant and provision virtual machines in Hyper-V (you’ll still need to specify Hyper-V as your vagrant provider in your Vagrantfile or via the--provisionflag when running it) – this is why we’re running the Linux distribution in WSL as a Windows admin. - You might also want to add
export VAGRANT_WSL_WINDOWS_ACCESS_USER_HOME_PATH="{Your project directory here}"– that might help with the permissions issues for Ansible, but may not be necessary – I kept it in my configuration after resolving the Ansible permissions issue.
You should now be able to integrate Vagrant and Ansible as you normally would on any other machine – I won’t cover that configuration here, but it’s standard and you can read about it in the Vagrant documentation.
Would all of this be less of a problem if your “regular user” was a member of the Hyper-v Administrators built-in group? You need to be an admin to change switches, but not to make vms and whatnot.
I wondered the same thing, but I don’t think so, unless you don’t need Vagrant and are just using WSL for Ansible deploys to another device (which is where I ended up). My recollection is that the admin requirement is because WSL’s Vagrant needs to communicate with the Windows copy of Vagrant, and they need to be running the same user account to do so, but Vagrant needs to run as an admin in Windows. I could be misremembering though, and it’s worth a shot. Typically I’d prefer to give the user the group permission to Hyper-V rather than running as an admin too.
Step 4 can be simplified by shutting down the running instance of Linux via WSL. The command from the Windows console “wsl –shutdown” will shut down all running instances of Linux while “wsl –terminate ‘Ubuntu'” will shutdown the instance named ‘Ubuntu’, which you can validate from the command “wsl –list”.
I hate rebooting, so this command was nice to discover.
Of course WordPress doesnt like code-formatting, so all those command parameters are double dashes, not em-dashes or single dashes. “wsl -h” with one dash, shortcut for dash-dash-help, will list all the available parameters